Virtual Private Networking
A virtual private network secures public network connections and in doing so it extends the private network into the public network such as internet. With a VPN you can create large secure networks that can act as one private network.
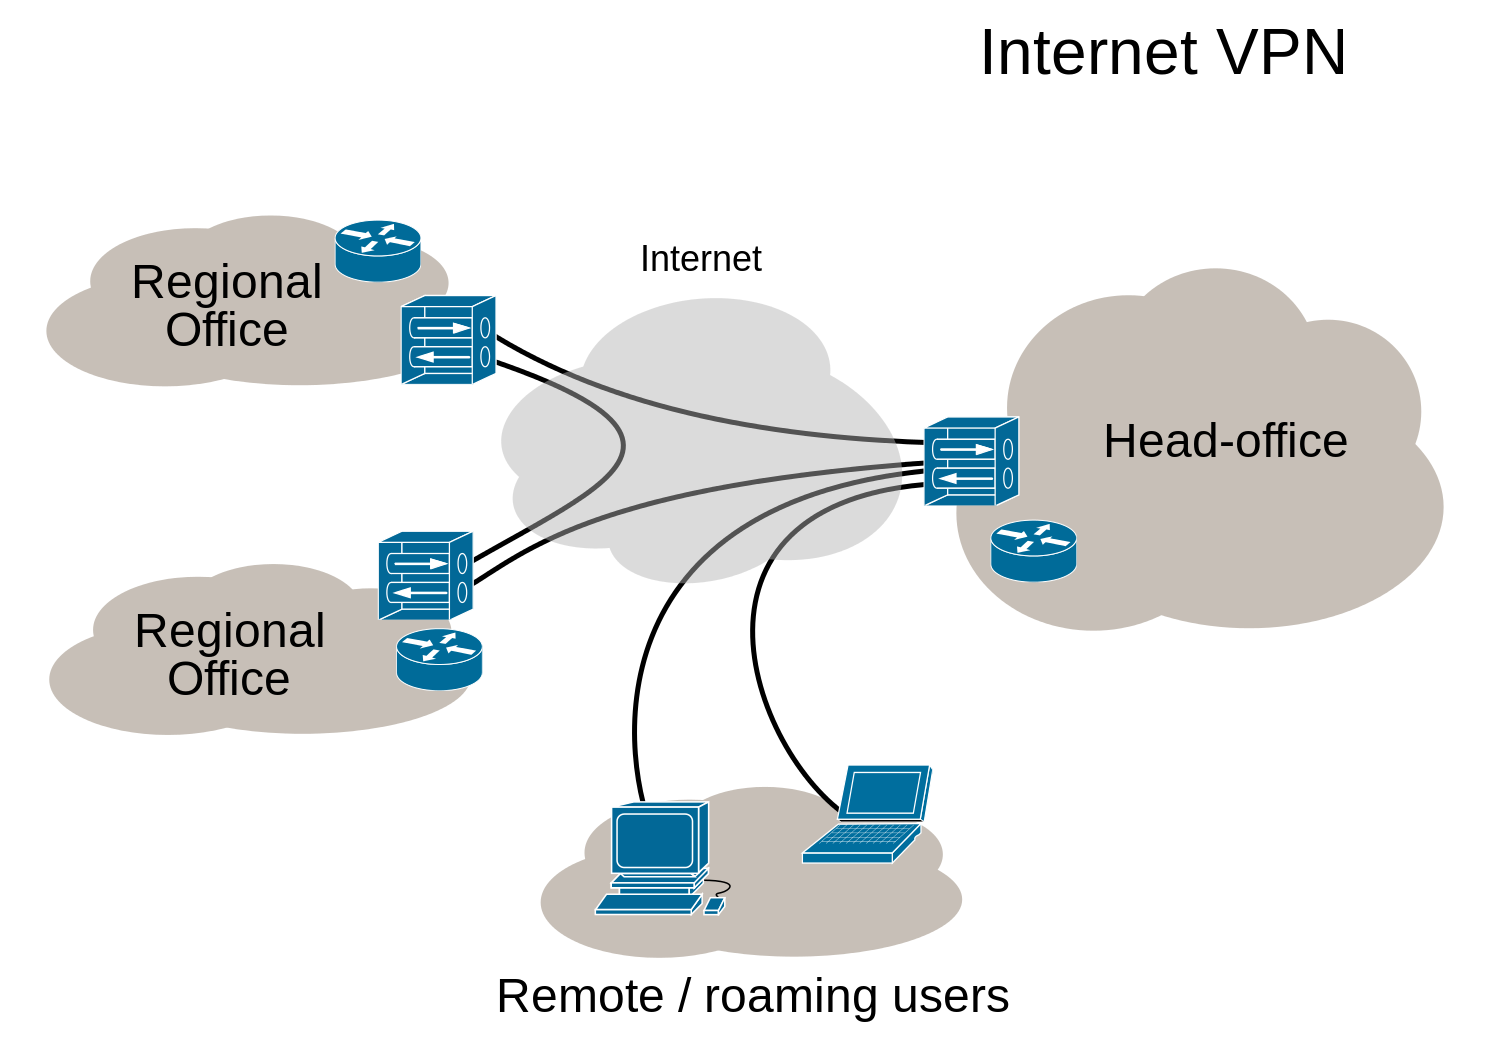
(picture from wikipedia)
Companies use this technology for connecting branch offices and remote users (road warriors).
OPNsense supports VPN connections for branch offices as well as remote users.
Creating a single secured private network with multiple branch offices connecting to a single site can easily be setup from within the graphical user interface. For remote users, certificates can be created and revoked and a simple to use export utility makes the client configuration a breeze.
OPNsense offers a wide range of VPN technologies ranging from modern SSL VPNs to well known IPsec as well as WireGuard and Zerotier via the use of plugins.
IPsec
Since IPsec is used in many different scenario’s and sometimes has the tendency to be a bit complicated, we will describe different usecases and provide some examples in this chapter.
General context
The IPsec module incorporates different functions, which are grouped into various menu items. Since the start of our
project we have been offering IPsec features based on the legacy ipsec.conf format, which we are migrating to
swantcl.conf as of version 23.1. While
migrating the existing featureset we came to the conclusion that the world has changed quite a bit and in order to
offer better (api) access to the featureset available we decided to plan for deprecation of the legacy “Tunnel settings” as they
have existed since we started. No timeline has been set, only a feature freeze on tunnels using the “Tunnel settings” menu item.
One of the main goals for the long run is to better align the gui components so they reflect the reality underneath, as we use strongswan, our aim is to follow their terminology more closely than we previously did.
The following functions are available in the menu (as of OPNsense 23.1):
Connections
New configuration tool offering access to the connections and pools sections of the
swanctlconfiguration
Tunnel Settings
Legacy IPsec configuration tool
Mobile Clients
Offering access to various options of the attr plugin and pool configurations for legacy tunnels
Pre-Shared Keys
Define secrets to be used for local authentication.
Key Pairs
For public key authentication collect public and private keys.
Advanced Settings
Define passthrough networks (to exclude from kernel traps), logging options and some generic options
Status Overview
Shows tunnel status
Lease Status
For mobile clients, show address leases for various pools configured
Security Association Database
Shows security associations, the fundamental concept of IPsec describing a relationship between two or more entities
Security Policy Database
Installed security policies describing which traffic is allowed to pass a tunnel
Virtual Tunnel Interfaces
Edit or create new
if_ipsec(4)interfaces and show the ones created by legacy tunnels
Log File
Inspect log entries related to IPsec
Migrating from tunnels to connections
Having used the tunnel settings from the early OPNsense days, some terminology might be a bit confusing when moving into the new options offered. This paragraph aims to explain some of the common terms from the tunnel section and their new place in the connections. For a full list of changes, the upstream migration documentation is an interesting read as well.
Phase 1 - The general connection settings, like local/remote addresses and general protocol settings. Choices in authentication to use are also part of this, they may involve multiple rounds.
Phase 2 - Nowadays Strongswan calls these children, as these define the
CHILD_SAsubsections in play. This is where you can define the networks on both ends. When multiple segments are being added into the same child, these are being treated as one policy where all of them are able to communicate to each other.Phase 1 / Tunnel Isolation - This option made sure every network defined in phase 2 would be treated as a child of it’s own (e.g. two phase 2’s would turn into two children)
Phase 2 / Manual SPD entries - Manual SPD entries, this has been replaced with it’s own menu option (Security Policy Database) offering more flexibility and visibility.
Note
Using DNS for endpoints is possible, but will work a bit different than previously as in most cases the firewall tried to resolve the names and didn’t use the functionality provided by Strongswan. It is however currently not possible to use DNS entries for VTI tunnels due to restrictions in if_ipsec(4) as these type of interfaces can’t be changed dynamically in a reliable way.
Note
When migrating Pre-Shared Key type tunnels to connections, make sure to add an entry in the “Pre-Shared Keys” module as well. If both ends should use their own identifier, fill in both local and remote values. The legacy module requested this information in the phase 1 page and wrote the same information to the secrets.
Since OPNsense uses the new Strongswan format also for legacy tunnels, it is rather easy to convert a tunnel manually
when downloading the swanctf.conf file from the machine. You can download it via .
The format is almost identical to the connections gui available in OPNsense.
Let’s take a look at the following swanctl.conf that contains a legacy con1 tunnel:
# This file is automatically generated. Do not edit
connections {
    con1 {
        unique = replace
        aggressive = no
        version = 2
        mobike = yes
        local_addrs = 203.0.113.1
        local-0 {
            id = 203.0.113.1
            auth = psk
        }
        remote-0 {
            id = 198.51.100.1
            auth = psk
        }
        encap = no
        remote_addrs = 198.51.100.1
        proposals = aes256-sha256-modp2048
        children {
            con1 {
                start_action = start
                policies = yes
                mode = tunnel
                sha256_96 = no
                local_ts = 192.168.1.0/24
                remote_ts = 172.16.100.0/24
                reqid = 1
                esp_proposals = aes256-sha256-modp2048
            }
        }
    }
}
pools {
}
secrets {
    ike-p1-0 {
        id-0 = 198.51.100.1
        secret = 0saGVsbG93b3JsZA==
    }
}
To convert this configuration:
Go to
Press + to add a new Tunnel and enable the advanced mode
Option |
Value |
swanctl.conf |
|---|---|---|
Proposals |
aes256-sha256-modp2048 (remove default) |
proposals = aes256-sha256-modp2048 |
Unique |
Replace |
unique = replace |
Version |
IKEv2 |
version = 2 |
Local addresses |
203.0.113.1 |
local_addrs = 203.0.113.1 |
Remote addresses |
198.51.100.1 |
remote_addrs = 198.51.100.1 |
Description |
con1-phase1 |
Press Save, then move to Local Authentication and press +
Option |
Value |
swanctl.conf |
|---|---|---|
Connection |
con1-phase1 |
|
Round |
0 |
local-0 |
Authentication |
Pre-Shared Key |
auth = psk |
Id |
203.0.113.1 |
id = 203.0.113.1 |
Description |
203.0.113.1 |
Press Save, then move to Remote Authentication and press +
Option |
Value |
swanctl.conf |
|---|---|---|
Connection |
con1-phase1 |
|
Round |
0 |
remote-0 |
Authentication |
Pre-Shared Key |
auth = psk |
Id |
198.51.100.1 |
id = 198.51.100.1 |
Description |
198.51.100.1 |
Press Save, then move to Children and press +
Option |
Value |
swanctl.conf |
|---|---|---|
Connection |
con1-phase1 |
|
Mode |
Tunnel |
mode = tunnel |
Policies |
X |
policies = yes |
Start action |
Start |
start_action = start |
Reqid |
1000 |
reqid = 1 |
ESP proposals |
aes256-sha256-modp2048 (remove default) |
esp_proposals = aes256-sha256-modp2048 |
Local |
192.168.1.0/24 |
local_ts = 192.168.1.0/24 |
Remote |
172.16.100.0/24 |
remote_ts = 172.16.100.0/24 |
Description |
con1-phase2 |
Press Save, then Save again to store the new Connection.
Note
Read about the reqid in the section Combining legacy tunnels and connections
Now we must configure a Pre-Shared Key that matches the Local Authentication and Remote Authentication:
Go to
Press + to add a new Pre-Shared Key
Option |
Value |
swanctl.conf |
|---|---|---|
Local Identifier |
203.0.113.1 (required now) |
|
Remote Identifier |
198.51.100.1 |
id-0 = 198.51.100.1 |
Pre-Shared Key |
helloworld |
secret = 0saGVsbG93b3JsZA== |
Type |
PSK |
auth = psk |
Description |
con1-phase1 |
Note
Gather the unhashed secret from . Generally it is good practice to document these secrets in a password manager.
After the initial configuration, go to and deactivate the con1 tunnel by unchecking Enabled in Phase1 and Phase2.
Go back to and ensure the new tunnel is Enabled. Press Apply and the new configuration will be active.
Combining legacy tunnels and connections
It is possible to combine tunnels and connections, but there are some constraints. As our legacy tunnels force a reqid
for each configured child (phase 2), there is a risk the automated numbering from the new connection children overlaps.
To prevent these overlaps, its required to set an unused reqid in the connection child.
Security policies and routing
In order to pass traffic over an IPsec tunnel, we need a policy matching the traffic. By default when adding a phase 2 (or child) policy a “kernel route” is installed as well, which traps traffic before normal routing takes place.
Note
Without a policy in place for the tunnel, traffic won’t be accepted, in case a policy with a kernel route overlaps a local or locally routed network the traffic will not be received by the host in question.
Tip
When matching overlapping networks in a policy (VTI or overlapping networks), make sure to exclude your own network segments in the
Passthrough networks option in to prevent traffic being blackholed.
Firewall rules
When using the legacy tunnels and Disable Auto-added VPN rules is not checked in
some automatic firewall rules are created for remote hosts connecting to this one.
The new connections feature does not offer this and (WAN) rules have to be specified manually in order to connect to IPsec on this host.
The relevant protocols and ports for IPsec are the following:
Protocol: ESP (https://en.wikipedia.org/wiki/IPsec#Encapsulating_Security_Payload)
Port: 500/UDP (https://en.wikipedia.org/wiki/Internet_Security_Association_and_Key_Management_Protocol)
Port: 4500/UDP (https://en.wikipedia.org/wiki/NAT_traversal#IPsec)
Note
One of the main reasons we are not offering automatic rules is that their either more open than expected (allow IPsec from anywhere) or too closed as the rule engine will “guess” the remote endpoint (in case of a fqdn).
The default behavior of our firewall is to block inbound traffic, which also means traffic using the tunnel should be allowed explicitly, the menu items offer access to the IPsec traffic policies.
Dead Peer Detection (DPD)
Dead Peer Detection (DPD) is a method of detecting a dead IKE peer as specified by RFC 3706.
When a peer is assumed dead, an action may be specified, such as closing the CHILD_SA or re-negotiate the CHILD_SA under a fresh IKE_SA.
Note
DPD is disabled by default, when using connections, make sure to specify a DPD delay (s) > 0 to enable the feature.
Actions may be specified on its children.
When using IKEv1 a dpdtimeout can be specified to control when a peer is considered to be inaccessible.
This setting has no effect on how IKEv2 handles retransmissions, in which case the general settings will be used as specified in the following document.
Warning
By default for IKEv2 the timeout on connections triggering a dpd action takes at least a couple of minutes, when quicker interaction
is needed the charon retransmit timings should be changed which applies to all tunnels. These settings can
be changed via the Advanced settings, or when not yet supported on your version, a custom strongswan configuration.
Implementation schemes
When setting up IPsec VPNs there are two main types of scenario’s with their own advantages and disadvantages.
Policy based
The first one is the standard policy based tunnel, which guards the security of the tunnel with policies and installs kernel
traps to send traffic over the tunnel in case it matches these policies. For example a local network 192.168.1.0/24
sending traffic to a remote location responsible for 192.168.2.0/24. The advantage of this scenario is the ease of setup,
no routes are needed to be configured, when in this example 192.168.1.10 contacts 192.168.2.10 the packets
are seamlessly forwarded over the tunnel to the remote location.
When local traffic doesn’t match the policies in question due to the tunnel needing Network Address Translation, that’s also possible as long as policies are manually added to the security policy database, this is also referred to as “NAT before IPsec”.
Route based (VTI)
Route based, also known as VTI, tunnels are using a virtual interface known as if_ipsec(4), which can be found under
. This links two ends of the communication for routing purposes
after which normal routing applies. The “(Install) Policies” checkmark needs to be disabled in this case for the child (phase 1 in the legacy tunnel configuration)
definition. Usually the communication policy (phase 2 or child) is set to match all traffic (either 0.0.0.0/0 for IPv4 or ::/0 for IPv6).
So the same example as the policy based option would need (static) routes for the destinations in question (192.168.1.0/24 needs
a route to 192.168.2.0/24 and vice versa), peering happens over a small network in another subnet (for example 10.0.0.1 <-> 10.0.0.2)
bound to the tunnel interface.
The advantage of this type of setup is one can use standard or advanced routing technologies to forward traffic around tunnels.
Important
Contrary to other physical or virtual interfaces, there are some important caveats to take into consideration when deciding to set up your network with VTI tunnels:
By default, OPNsense can only filter on the
IPsecgroup (enc0).VTI interfaces show up as regular interfaces in the GUI, but firewall rules specified on these interfaces will not apply by default. Instead, they must be specified on the
IPsecgroup (enc0). The OS makes a hard distinction between filtering on theIPsecgroup and VTI interfaces. To flip this behavior, the following tunables must be specified:net.inet.ipsec.filtertunnel, value1.net.inet6.ipsec6.filtertunnel, value1.net.enc.in.ipsec_filter_mask, value0.net.enc.out.ipsec_filter_mask, value0.
The downside is that policy-based tunnels (
enc0) cannot be filtered anymore.If you require a combination of Policy-based and VTI-based tunnels in your setup, the recommended filtering approach is to specify all firewall rules on the automatically available
IPsecgroup (enc0). Since all IPsec traffic passes throughenc0, both policy-based and VTI-based traffic can be filtered here.NAT rules can be specified on VTI interfaces in pure VTI-based setups without issue. However, if you require NAT on the VTI-based traffic, but you are filtering on the
IPsecgroup, you must enable theSkip firewall rulesoption in the Virtual Tunnel Interface configuration, so no (automatic) rules interfere with the traffic.
Warning
The most reliable VTI tunnel setups use static addresses on both ends of the tunnel as the if_ipsec(4) device
matches both source and destination [#].
In recent versions of our product it is possible to auto-detect and reconfigure the tunnel on connect by
keeping both local and remote addresses of the VTI empty in .
Tip
Since VTI tunnels are bound to requestid’s it is important CHILD_SA’s are instantiated not more than once. To prevent duplicate children, configure Unique as Replace on the instance (advanced mode) and use a “trap” policy for the start action.
Road Warriors / Mobile users
IPsec may also be used to service remote workers connecting to OPNsense from various clients, such as Windows, MacOS, iOS and Android. The type of client usually determines the authentication scheme(s) being used.
In case clients should be offered default settings, these can be configured from . Pool options (Virtual IPvX Address Pool) on this page will be used by the legacy tunnel configuration only, when using the new connections module one may configure different pools per connection.
Note
If you are configuring Radius authentication using the new Connections module, make sure to select the relevant Radius servers in under Radius (eap-radius). This pool of servers will be shared across all connections. This option will not be visible if you have legacy Radius authentication methods configured.
The examples section contains various options available in OPNsense. When using the new “connections” option available as of OPNsense 23.1, different examples from Strongswan are usually quite easy to implement as we follow the swantcl.conf format quite closely in the new module.
Examples
This paragraph offers examples for some commonly used implementation scenarios.
New > 23.1 ()
Tip
The number of examples for the new module on our end is limited, but for inspiration it’s often a good idea to walkthrough the examples provided by Strongswan. Quite some swanctl.conf examples are easy to implement in our new module as we do follow the same terminology.
Legacy ()
The following client setup examples are available in our documentation:
Note
Using Network Address Translation in policy based tunnels is different, due to the fact that the installed IPsec policy should accept the traffic in order to encapsulate it. The IPSec BINAT document will explain how to apply translations.
CARP considerations
When using IPsec in a high availability setup, it is important to understand the implications of the setup. Without assuming what the remote gateway looks like (which may be a single device or a high availability setup as well), the following considerations should be taken into account:
For IKEv2, MOBIKE should be disabled. Due to the nature of CARP, a virtual IP in backup state will “disappear”, which will trigger MOBIKE to try to re-establish the connection from a different available IP, thus overriding your “Local address” configuration. In a lot of cases this will be the primary IP of the WAN interface.
In all cases (initiator, responder or both) the “Local Address” must be set to a CARP virtual IP.
DPD must at least be configured on the peer to detect a non-responsive peer and reauthenticate the connection. DPD is usually the limiting factor in failover response time and is therefore the primary functionality to adjust to allow for faster failover. See the DPD section for more information and constraints.
IPsec connections never failover seamlessly between primary and backup and always need a fresh IKE_SA. If quicker failover is required, dynamic routing with route-based tunnels is likely a better solution.
Tuning considerations
In normal routing/firewalling scenarios, most significant performance gains in terms of throughput are achieved by distributing flows across multiple CPU cores. In any physical or virtual setup, flow distribution is often determined by hardware RSS on a NIC, or virtual queues emulating this behavior. Such flows are processed by default on the receiving CPU (direct dispatch via netisr), making sure that traffic is processed in parallel. The distribution mechanism (before any OS processing) making this possible often hashes the IP/TCP/UDP 5-tuple to determine on which CPU a flow should be handled. Proper distribution therefore requires proper uniqueness of packet headers.
When any tunneling takes place, as is the case for IPsec with ESP flows, many different traffic flows may be encapsulated inside a single IP header, reducing uniqueness of traffic and therefore the ability to distribute work. Unless NICs or virtualized queues can distribute work on ESP packets, which is rarely the case, OPNsense firewalls can often only receive such tunneled flows on a single CPU, because the outer IP header is often the same.
If you have a simple, single-tunnel, single-flow setup (two flows for in-out), you may benefit from using async crypto to dispatch cryptographic work to multiple processors. However, there is no guarantee this will speed up work as it is dependent on multiple factors.
In order to do so, add or change the following tunable in :
Note
net.inet.ipsec.async_crypto = 1
As soon as an IPsec packet is received, decryption must be handled first before anything meaningful can be done with the actual data. This process can be parallelized with the command above, but because IPsec packets need to be processed in an explicit order, these have to be re-injected in the same one, often making performance gains negligible - especially when the machine is busy. The FreeBSD kernel queues decapsulated IPsec packets at all times, in contrast to regular ethernet frame handling (see technical note below). This also means that IPsec flows must adhere to the default single thread limitation after decryption. To fan out the traffic to multiple CPUs after decryption, you can increase the amount of threads bound to netisr:
Note
net.isr.maxthreads= -1 <– equal the number of cores in the machine
You can also be more specific and set only N amount cores to be used for ipsec traffic processing.
In very busy environments, this change likely has the most impact.
Lastly, but less practical, you can scale up IPsec by ensuring distribution earlier on in the chain by spreading out more flows across
multiple IKE SAs (different source/destination selectors). In this scenario you must ensure multiple ESP flows coming from different
source IP addresses when configuring site-to-site tunnels. You must combine this with the net.isr.maxthreads setting to keep
the traffic distributed while it is routed through the system.
Technical background
Netisr can be thought of as the conceptual equivalent of Receive Packet Steering (RPS) in Linux. How packets are distributed throughout the system is dependent on the packet protocol.
Netisr allows for two basic modes of operation: direct dispatch or deferred (queued) dispatch. Netisr is always single-threaded by default in deferred dispatch mode to make sure the system adheres to the strong ordering requirements in protocols.
In direct dispatch mode, the network driver handling the packet receive buffer moves the packets up the stack. If the packet is to be routed out via a different interface, this entire process is handled in the same thread (including decryption for IPsec, unless async crypto is set), which doesn’t exit until the packet is routed out. During this time, the receive buffer may fill with new packets. In this mode, the single-threaded limitation doesn’t apply as the execution context remains on the receiving thread, of which there are often multiple via the data channels provided by the NICs/drivers.
In deferred dispatch mode, the first protocol allowing deferred processing will queue the packet, at which point the driver input routine will exit immediately, so it can process new packets faster. This decoupling allows netisr to control which flows are executed on which threads (and by extension, CPU).
When it comes to IPsec, packets are always queued via netisr after decryption. Because netisr is single-threaded in this mode,
it’s always queued to the same separate thread. The maxthreads option overcomes this limitation. Furthermore, the SPI value
is used to calculate which thread the flow ends up on. This is true for both VTI- and policy-based configurations.
Miscellaneous variables
Path MTU Discovery
When trying to enforce path mtu discovery (PMTU), you need to make
sure packets leave the network with the DF set. The kernel offers a tunable net.inet.ipsec.dfbit which
offers 3 options, 0, clear the bit on packets leaving the firewall (default), 1, set the DF bit or 2
to copy the bit from the inner header.
Diagnostics
In order to keep track of the connected tunnels, you can use the to browse through the configured tunnels.
The is also practical to gain insights in the registered policies, when NAT is used, the additional SPD entries should be visible here as well.
When troubleshooting problems with your firewall, it is very likely you have to check the logs available on your system. In the UI of OPNsense, the log files are generally grouped with the settings of the component they belong to. The log files can be found in the “Log file” menu item.
Tip
When trying to debug various issues, the amount of log information gathered can be configured using the settings in .
Custom configurations
In some (rare) cases one might want to add custom configuration options not available in the user interface, for this reason we do support standard includes.
While the swanctl.conf and the legacy ipsec.conf configuration files are well suited to define IPsec-related configuration parameters,
it is not useful for other strongSwan applications to read options from these files.
To configure these other components, it is possible to manually append options to our default template, in which case files
may be placed in the directory /usr/local/etc/strongswan.opnsense.d/ using the file extension .conf
IPsec configurations are managed in swantcl.conf format (as of 23.1), merging your own additions is possible by
placing files with a .conf extension in the directory /usr/local/etc/swanctl/conf.d/.
Warning
Files added to these directories will not be mainted by the user interface, if you’re unsure if you need this, it’s likely a good idea to skip adding files here as it might lead to errors difficult to debug.
Note
Prior to version 23.1 it was also possible to add secrets and ipsec configurations in /usr/local/etc/ipsec.secrets.opnsense.d/
and /usr/local/etc/ipsec.opnsense.d/, with the switch to 23.1 these files are deprecated and should be manually migrated into swanctl.conf
format.
OpenVPN (SSL VPN)
One of the main advantages of OpenVPN in comparison to IPsec is the ease of configuration, there are fewer settings involved and it’s quite simple to export settings for clients.
General context
The OpenVPN module incorporates different functions to setup secured networks for roadwarriors and site to site connections.
Since the start of our project we organized the openvpn menu section into servers and clients, which actually is a role
for the same OpenVPN process. As our legacy system has some disadvantages which are difficult to fix in a migration, we have chosen
to add a new component named Instances in version 23.7 which offers access to OpenVPN’s configuration in a similar way as
the upstream documentation describes it.
This new component will eventually replace the existing client and server options in a future version of OPNsense, leaving
enough time to migrate older setups.
Tip
When upgrading into a new major version of OPNsense, always make sure to read the release notes to check if your setup requires changes.
Note
OpenVPN on OPNsense can also be used to create a tunnel between two locations, similar to what IPsec offers. Generally the performance of IPsec is higher which usually makes this a less common choice. Mobile usage is really where OpenVPN excels, with various (multifactor) authentication options and a high flexibility in available network options.
The following functions are available in the menu (as of OPNsense 23.7):
Instances
New instances tool offering access to server and client setups
Servers
Legacy server configuration tool
Clients
Legacy client configuration tool
Client Specific Overrides
Set client specific configurations based on the client’s X509 common name.
Client Export
Export tool for client configurations, used for server type instances
Connection Status
Show tunnel status
Log File
Inspect log entries related to OpenVPN
Public Key Infrastructure (X.509)
OpenVPN is most commonly used in combination with a public key infrastructure, where we use a certificate authority which signs certificates for both server and clients (Also know as TLS Mode). More information about this topic is available in our Trust section.
Tip
As of version 24.1 OPNsense is able to use OCSP to validate client certificates when using the new Instances. Make sure Use OCSP (when available)
is enabled in the trust section of the server instance and the CA used contains a proper AuthorityInfoAccess extension
as described in our Trust section.
Firewall rules
To allow traffic to the tunnel on any interface, a firewall rule is needed to allow the tunnel being established.
The default port for OpenVPN is 1194 using protocol UDP.
After communication has been established, it’s time to allow traffic inside the tunnel. All OpenVPN interfaces defined in OPNsense are grouped as OpenVPN.
Tip
In order to use features as policy based routing or manual routes, you can assign the underlying devices and use them in a similar fashion as physical interfaces.
High availability [CARP]
When operating an OpenVPN server, there’s not much needed to allow an active/passive setup for your environment other then using a virtual (CARP) address. As the server will stop receiving traffic when the virtual address doesn’t it, the backup will eventually become out of service automatically.
In client mode, the OpenVPN instance needs to stop trying to reconnect when it’s not in MASTER mode, the legacy
client module shutsdown all instances directly attached to the interface. Our new instances module allows to select
the vhid to track. In most cases an explicit bind isn’t needed for a client, the default for a client is to
use the nobind option.
Note
It’s not possible to move between machines fully seamless as the client will have to reconnect in order to reach a valid state again.
Examples
This paragraph offers examples for some commonly used implementation scenarios.
Note
When using a site to site example with SSL/TLS instead of a shared key, make sure to configure “client specific overrides”
as well to correctly bind the remote networks to the correct client.
Client Specific Overrides
The mechanism of client overrides utilises OpenVPN client-config-dir option, which offer the ability to use
specific client configurations based on the client’s X509 common name.
It is possible to specify the contents of these configurations in the gui under .
Apart from that, an authentication server () can also provide client details in special cases when returning
Framed-IP-Address, Framed-IP-Netmask and Framed-Route properties.
Note
Client specific overwrites will be written after authentication or client connect (depending on the type of setup). This in order for authentication services like RADIUS to be able to provision additional properties, such as tunnel and local networks.
A selection of the most relevant settings can be found in the table below.
Parameter |
Purpose |
|---|---|
Disabled |
Set this option to disable this client-specific override without removing it from the list |
Servers |
Select the OpenVPN servers where this override applies to, leave empty for all |
Common name |
The client’s X.509 common name, which is where this override matches on |
IPv[4|6] Tunnel Network |
The tunnel network to use for this client per protocol family, when empty the servers will be used |
IPv[4|6] Local Network |
The networks that will be accessible from this particular client per protocol family. |
IPv[4|6] Remote Network |
These are the networks that will be routed to this client specifically using iroute, so that a site-to-site VPN can be established. |
Redirect Gateway |
Force the clients default gateway to this tunnel |
Note
When configuring tunnel networks, make sure they fit in the network defined on the server tunnel itself to allow the server to send data back to the client.
For example in a 10.0.0.0/24 network you are able to define a client specific one like 10.0.0.100/30.
To reduce the chances of a collision, also make sure to reserve enough space at the server as the address might already be assigned to a dynamic client otherwise.
Tip
When using topology “subnet” the netmask usually equals the one defined in the instance itself as the gateway being pushed to the client is the first address in the network and otherwise unreachable.
Troubleshooting common issues
The most common causes for non functional overwrites are caused by mismatches, in order to debug these, make sure to check the logs for messages like the following:
Locate overwrite for 'XXX' using server 'XXX' (vpnid: XXX)<< trying to find an overwrite (user authentication))Usually followed by
user 'XXX' authenticated using 'XXX' XXXshowing username, authenticator used and optionally the overwrite type and filename.
client config created @ XXX<< file written on client connect (without user authentication)unable to write client config for XXX, missing target filename<< no matching overwrite found (without user authentication)
By default overwrites are matched by certificate common name, when Force CSO Login Matching (legacy) or
Username as CN (instances) are set the username will be used instead.
Wireguard
General context
WireGuard® is a simple yet fast and modern VPN solution, which in some cases is more convenient than IPsec or OpenVPN, certainly in terms of options you need to configure. In our experience IPsec is the fastest solution for site-to-site connections, but Wireguard is the simplest option to setup.
A wireguard setup on our end exists of the following main components:
Instances: in the wireguard configuration these are called “interfaces” and they describe how the virtual
wgXdevice on our end is configured in terms of addressing and cryptography.Peers: these are the clients that are allowed to connect to us, described by their optional remote address including the networks that are allowed to pass through the tunnel. Peers belong to one or more instances.
Instances
In order to configure an instance, we start by adding one in the gui and generate a keypair. The public key is usually required for the
other end of the tunnel (peer). An unused port to listen on is required as well. The tunnel addresses are configured on the wgX device
(which is always visible in ).
By default, when “Disable routes” is not set, routes are created for each connected peer to the networks selected in “Allowed IPs”, optionally only a single gateway route might be configured as well.
Note
When choosing tunnel addresses, make sure the network defined includes the addresses being used by the peers. For
example when choosing 10.10.0.1/24 the wgX instance has this address configured and is able to accept
a peer using 10.10.0.2/32.
Tip
Remember to create a firewall rule to allow traffic to the configured port and inside the tunnel.
Peers
Peers define the hosts that we exchange information with, which might be a road-warrior type or a static destination, in which case you either provide or omit an “Endpoint Address and Port”. At minimum you need the public key of the other party, optionally you may offer a pre-shared key as additional security measure. The “Allowed IPs” define the networks that are allowed to pass the tunnel.
Note
In most cases the “Allowed IPs” list contains the networks used on the remote host and the peer ip address (instance/tunnel address) configured on the other end.
Tip
When NAT and firewall traversal persistence is required, the :code:` Keepalive interval` can be used to exchange packets every defined interval ensuring states will not expire.
Peer generator
When creating login credentials for multiple clients, a more practical method is also available to generate these. The peer generator offers you a simple selection for the instance you wish to generate credentials for and stores relevant fields like endpoint location for future use. It also helps to assign IP addresses to clients based on the network defined in the instance.
Warning
Since IP addresses are only stored when the user saves the profile (and calculated upfront), it’s not possible to create users for the same instance concurrently.
Each newly created client will receive a keypair, for which the public key will be stored on the firewall in the peers section.
Note
The private key will not be stored on the firewall as this only belongs to the device your installing the profile on. Regenerating a config file, automatically means you will need to import it again in the client as well to avoid trust being broken.
After providing the relevant information for the client to login, you can copy the qrcode or the text in the Config
text box to configure the client.
Don’t forget to press the “Store and generate next” button to actually store the public information in the firewall and click “Apply” on the “Peers” page so the client is able to login.
High availability (using CARP)
When using wireguard on active/passive high availability clusters, only one instance at a time is allowed to communicate to the
other party. In OPNsense this can be reached by selecting a vhid to track as instance dependency {Depend on (CARP)}.
If an instance depends on a CARP vhid, it will query the current status and determine if the interface should be usable (when MASTER), the interface status (up/down) will be toggled accordingly.
Note
As the interface itself will not change, all of its addresses and routes remain when not being active. This ensures a relatively quick switch between roles.
Tip
Because the carp dependency is managed per instance, you are able to keep tunnels available selectively, for example to manage the machines remotely.
Diagnostics and debugging
In you can find the configured instances and peers including their last known
handshake and the amount of data being exchanged. For Instances you are also able to see if the device underneath (wgX) is
up or down, depending on the carp status described in the previous chapter.
Tip
Although wireguard itself offers very limit logging, our setup process will make a note of errors and signal about certain events. When having issues configuring an instance or peer, always make sure to check the logs in first.
Warning
When having issues exchanging packets between both ends of the tunnel, always make sure to check if the “Allowed IPs” in the peer configurations contain the proper networks. In case traffic is not allowed when traveling in, its dropped silently (a capture will not show it), roughly the same happens when traveling out, a capture will show it, but nothing will be send out.
Note
Runtime debugging from the console is possible using the ifconfig command,
for more information see the upstream manual page
Examples
This paragraph offers examples for some commonly used implementation scenarios.
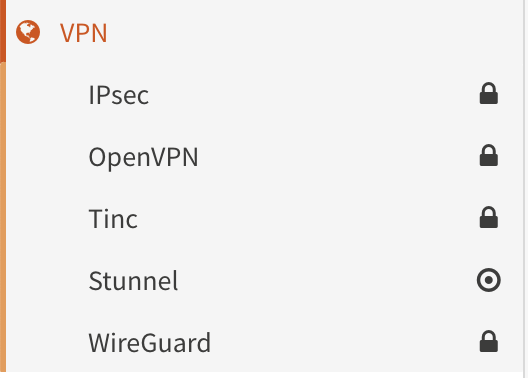
Plugin VPN options
Via plugins additional VPN technologies are offered, including:
OpenConnect - SSL VPN client, initially build to connect to commercial vendor appliances like Cisco ASA or Juniper.
Stunnel - Provides an easy to setup universal TLS/SSL tunneling service, often used to secure unencrypted protocols.
Tinc - Automatic Full Mesh Routing
WireGuard - Simple and fast VPN protocol working with public and private keys.
Zerotier - seamlessly connect everything, requires account from zerotier.com, free for up to 100 devices.