Setup SSL VPN Road Warrior

Road Warriors are remote users who need secure access to the companies infrastructure. OPNsense uses OpenVPN for its SSL VPN Road Warrior setup and offers OTP (One Time Password) integration with standard tokens and Googles Authenticator.
Tip
Did you know that OPNsense offers two-factor authentication throughout the entire system? See for more information: Two-factor authentication
Note
For the sample we will use a private IP for our WAN connection. This requires us to disable the default block rule on wan to allow private traffic. To do so, go to and uncheck “Block private networks”. (Dont forget to save and apply)

Index
Before you start
Before starting with the configuration of an OpenVPN SSL tunnel you need to have a working OPNsense installation with a unique LAN IP subnet for each side of your connection (your local network needs to be different than that of the remote network).
Note
For the sample we will use a private IP for our WAN connection. This requires us to disable the default block rule on WAN to allow private traffic. To do so, go to and uncheck “Block private networks”. (Don’t forget to save and apply)

Network topology
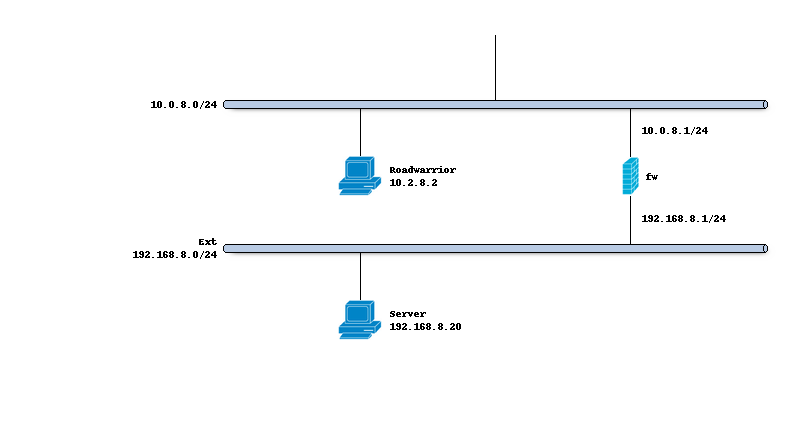
The schema below describes the situation we are implementing. One client using an “external” ip address of 10.0.8.2/24
a firewall we are connecting to at 10.0.8.1/24 constructing a tunnel using 10.2.8.0/24 to reach 192.168.8.0/24.
Preparations
Trust
In order to setup a tunnel on both ends, we need to configure certificates to warrant trust between both machines. We need a root CA that issues two leaf certificates, one for this server and one for a user.
Create a certificate chain using the following tutorial:
Setup Self-Signed Certificate Chains
Root CA:
SSL VPN CALeaf Certificate - Type Server: Set the Common Name to the FQDN of this machine.
Leaf Certificate - Type Client: Create a user with the same username as this certificates Common Name.
The root CA issues the leaf certificates directly; we do not need an intermediate CA.
Note
It is best practice to offer each user their own certificate using the same common name as the username, although it is also possible for clients to share a certificate. When adding a certificate from the user manager the CN is automatically set to its name. In this example we will only authenticate using the certificate, no additional user or password will be required.
Static keys
We create a static key and define it’s use in , for this example select auth as mode and click the gear button to generate one. Provide a description for this key.
Create a server instance
Now the generic setup is done, we can configure a new server type instance via
Property |
site B |
|---|---|
Role |
Server |
Description |
MyServer |
Protocol |
UDP (IPv4) |
Port number |
1194 |
Bind address |
10.10.8.1 1 |
Server (IPv4) |
10.1.8.0/24 (the tunnel network used) |
Certificate |
choose the prepared server certificate |
TLS static key |
choose the prepared static key |
Authentication |
Local Database 2 |
Strict User/CN Matching |
[V] 3 |
Local Network |
192.168.8.0/24 |
Redirect gateway |
Leave empty 4 |
Note 1
Leave empty to bind to all addresses assigned to this machine or use a loopback address combined with a Destination NAT (Port Forward) when the external address is not static.
Note 2
When users are also required to use a one-time-password, just select an authentication server that supports the additional token.
Note 3
Selecting the “Strict User/CN Matching” option warrants only matching user/certificate can login, when sharing a single certificate between clients this option needs to be deselected.
Note 4
If you want all outgoing IP traffic to be redirected over the VPN, you can set the option to default.
For this to work, a manual NAT outbound rule must be created.
Next go to and add a rule to allow traffic on port 1194/UDP from the other
host. At minimum we should add a rule similar to this one:
Property |
site B |
|---|---|
Interface |
WAN |
Protocol |
UDP |
Destination port range |
1194 |
Finally we are going to allow traffic on the tunnel itself by adding a rule to , for this example we keep it simple and add one to allow all, in which case we can save the defaults when adding a rule.
Export client profile
With the server in place it’s time to setup the client on OPNsense, for this we go to and export a profile for the remote client.
Property |
Value |
|---|---|
Remote Access Server |
select the Roadwarrior server “MyServer” |
Export type |
File Only 1 |
Hostname |
10.10.8.1 |
Note 1
Most clients support the standard ovpn format, when using a tool like Viscosity from Sparklabs (https://www.sparklabs.com/viscosity/)
you can also choose the proper type here.
Next client on the certificate with link user in the grid below and install the certificate on the client.
Test connectivity
After connecting the client, use the page to watch the status of the connected client. It should show the client with byte counters.
Now try to ping from Site A (10.0.8.20) to Site B (192.168.8.20).
