Web Application Firewall
Index
As part of the OPNsense Business Edition, Deciso offers a plugin to easily protect webservices against all sort of injection attacks and provides encryption for traffic to and from the outside world.
Our Web Application Firewall plugin offers some functionality which can also be found in community plugins available, but in a more user friendly manner. It combines the features most commonly used in reverse proxies, such as TLS offloading and load balancing.
To ease maintenance the OPNWAF plugin offers usage of both internal certificates or newly generated
using the ACME protocol via Let’s Encrypt with a single click.
Prerequisites
Before using this plugin in combination with Let’s Encrypt, make sure port 443 isn’t being used for the web gui of this firewall ().
Note
When using Let’s Encrypt, The Web Application Firewall uses the tls-alpn-01 challenge type for easy domain verification, this requires the virtual server to listen on port 443. Make sure the firewall allows incoming HTTPS connections on port 443. If the client connects via a custom port, you can forward these requests to port 443, and configure the virtual server to forward these requests to the correct internal port.
Installation
To install this plugin, go to and search for os-OPNWAF, the [+] button downloads and installs the software.
Next go to to enable it.
General
Before deep diving into the settings pages, we will explain the most important terminology used in this module.
Virtual servers
A virtual server (also known as a virtual host) is a a concept which allows the use of multiple domains on a single webserver using the same port. In our case it offers the possibility to host various webservers inside your network and forward traffic to them in a secure fashion.
Locations
Locations reside in virtual servers and describe on a path level how requests are being handled, if for example one would
like to forward only a subdirectory (like /api) to a server in the network, the location is where to configure this.
Web protection
The web protection options offer easy access to the OWASP ModSecurity ruleset , which offers a set of generic attack detection rules against a wide range attacks including the OWASP Top Ten.
Setup
Before configuring virtual servers, let’s take a look at the general settings pages (). After installation, the module itself should be enabled by default.
In order to use the integrated ACME client (for Let’s Encrypt), the ACME enable checkbox needs to be set, the certificate agreement needs to be accepted (next checkbox) and contact email needs to be specified.
Optionally a permanent redirect from HTTP to HTTPS can be enabled for all virtual servers. The HTTP port can be customized if necessary by enabling the advanced mode. Do not forget to create an additional firewall rule to allow access to the HTTP Port. When it is non standard, a port forward is necessary (e.g., listen on 8080, forward 80 to 8080).
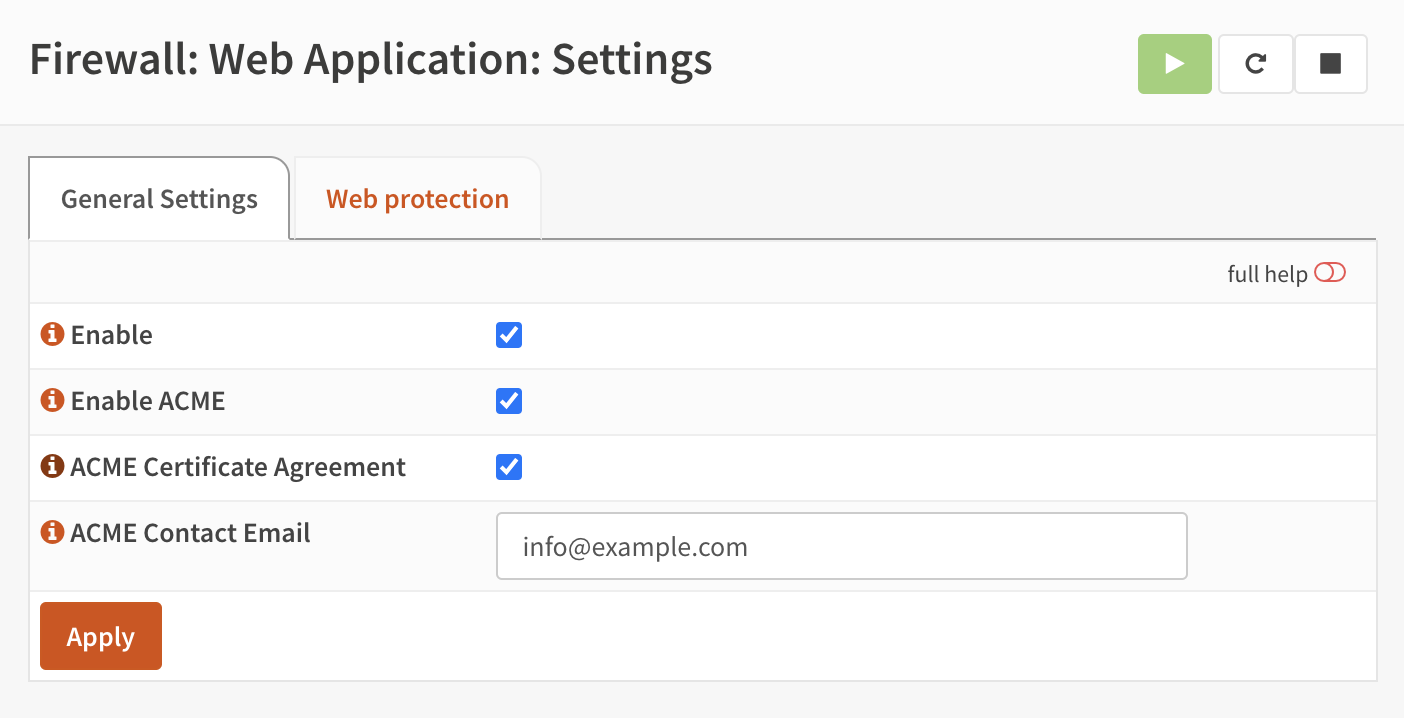
Web protection is not enabled by default, but you can enable it in the Web protection tab. This is also the place to configure the module and settings which apply for all virtual hosts.
To optionally configure a default catch-all virtual server, select a certificate for Strict SNI Check in .
The certificate can be self-signed and match the CN of the the default server name. Any invalid SNI will now be served an error document.
If a wildcard A-Record is defined for a base domain (e.g., *.example.com in A 203.0.113.1), each subdomain would be answered
by the first configured virtual server otherwise, even if the SNI does not match it.
General Settings
Option |
Description |
|---|---|
General Settings |
|
Enabled |
Enable the gateway webserver. |
ACME Settings |
|
Enable ACME |
Enable the ACME protocol to automatically provision certificates using Let’s Encrypt. This will need the virtual server to be accessible on the standard HTTPS port (443 |
ACME Certificate Agreement |
When you use mod_md to obtain a certificate, you become a customer of the CA (e.g. Let’s Encrypt). That means you need to read and agree to their Terms of Service, so that you understand what they offer and what they might exclude or require from you. mod_md cannot, by itself, agree to such a thing. |
ACME Contact Email |
The ACME protocol requires you to give a contact url when you sign up. Currently, Let’s Encrypt wants an email address (and it will use it to inform you about renewals or changed terms of service). |
Server Settings |
|
HTTP Version |
Select the maximum allowed HTTP version this server can use for any connection. If you want to proxy to a location via HTTP/2, use h2:// or h2c:// inside a virtual server. |
Redirect HTTP to HTTPS |
Enables a permanent redirect (301 Moved Permanently) from HTTP to HTTPS. This will bind the default HTTP port additionally for all virtual hosts. Make sure this port is not bound to a different service, like the default WebGUI redirect rule. |
HTTP Port |
When enabling the HTTP to HTTPS redirect, this port will be bound for HTTP (default 80). |
Multi Processing Modules |
Select the processing module the server should use. The default mpm_event is the most scalable module. For older software and state sensitive protocols, mpm_prefork can be chosen. |
Strict SNI Check |
Respond with an error when a client requests an SNI that does not exist as configured virtual server. This requires a certificate for a default catch-all virtual server; once added the strict SNI check is active. The certificate can be a self-signed one, it is only used as a placeholder for the TLS engine. |
Server Name |
The default name of this server. It is also used for the default catch-all virtual server if “Strict SNI Check” is enabled. |
Error Document |
Choose error documents to use for common issues, like page not found. This will be added to the default catch-all virtual server if “Strict SNI Check” is enabled. |
Web Protection
It is recommended to enable the web protection, but not change the default values of individual options without reason. The defaults are tuned for high security while also maintaining good performance and compatibility.
Option |
Description |
|---|---|
Enable |
Enable content protection to prevent against different types of (injection) attacks |
Paranoia Level |
A paranoia level of 1 is default. In this level, most core rules are enabled. PL1 is advised for beginners, installations covering many different sites and applications, and for setups with standard security requirements. A higher level will increase sensitivity at the cost of more false positives. |
Allowed HTTP Verbs |
Leave empty to use the default HTTP Verbs. Choosing one or more items here will overwrite the default globally. If there are WebDAV servers, adjusting these Verbs can be mandatory with methods like PROPPATCH or PROPFIND. |
Request Body Limit Action |
What to do if the request body size is above the configured limit. The default is Reject. Keep in mind that this setting will automatically be set to ProcessPartial when using DetectionOnly mode. |
Request Body Limit |
Maximum request body size in bytes we will accept for buffering. If you support file uploads then the value given has to be as large as the largest file you are willing to accept. The hard limit is 1GB. |
Request Body No Files Limit |
Maximum request body size in bytes we will accept for buffering with files excluded. You want to keep this value as low as practical. The hard limit is 1GB. |
Request Body In Memory Limit |
Store the request body data in memory. When the multipartparser reaches this limit, it will start using your hard disk for storage. That is slow, but unavoidable. The hard limit is 1GB. |
Response Body Limit Action |
What happens when we encounter a response body larger than the configured limit? By default, we process what we have and let the rest through with the Process Partial option. That is somewhat less secure, but does not break any legitimate pages. |
Response Body Limit |
Maximum response body size (in bytes) we will accept for buffering. The hard limit is 1GB. |
Regex Match Limit |
Maximum regex matching length in security rules. If set too high, could cause performance issues or DoS. |
Regex Match Limit Recursion |
Maximum regex recursion matching length in security rules. If set too high, could cause performance issues or DoS. |
Configure virtual servers
With the general settings in place, we can start adding virtual servers to offload traffic to machines in our network. First go to and click on the [+] in the top section of the screen, which defines the virtual servers.
Option |
Description |
|---|---|
Enabled |
Enable this virtual server. |
LogLevel |
(advanced mode) Log verbosity level |
ServerName |
Fully qualified hostname for this server. |
Port |
Port number this vhost will listen on, can easily be combined with firewall nat rules to map traffic to non standard ports when origination from remote destinations. (e.g., listen on 8443, forward 443 to 8443). |
Error Document |
Choose error documents to use for common issues, like page not found. |
Description |
User friendly description for this vhost (optional). |
Trust |
|
Enable ACME |
Enable the ACME protocol to automatically provision certificates using Let’s Encrypt, when set will ignore the selected certificate (and enable SSL on this virtual server). |
Certificate |
When using a certificate available in the system trust store, select it here. |
SSL Proxy check peer |
This directive configures host name checking for server certificates when mod_ssl is acting as an SSL client. The check will succeed if the host name from the request URI matches one of the CN attribute(s) of the certificate’s subject, or matches the subjectAltName extension. If the check fails, the SSL request is aborted and a 502 status code (Bad Gateway) is returned. |
Client Auth |
|
CA for client auth |
Require a client certificate signed by the provided authority before allowing a connection. |
CRL for client auth |
Attach the (first) found certificate revocation list for the selected CA to this virtual host. Please note when no CRL is offered all clients are rejected. |
Verify depth for client auth |
The depth actually is the maximum number of intermediate certificate issuers, i.e. the number of CA certificates which are max allowed to be followed while verifying the client certificate. |
OpenID Connect |
|
OIDC Provider |
Select an OpenID Connect Provider for authentication created in “System - Access - OpenID Connect”. Afterwards, select the claim in the individual locations of this virtual server. |
OIDC Redirect URI |
The redirect_uri for this OpenID Connect client; this is a vanity URL that must ONLY point to a path on your server protected by this module but it must NOT point to any actual content that needs to be served. Leave empty to use the provided default. |
OIDC HTTP Timeout Short |
Timeout in seconds for short duration HTTP calls. This defines the maximum duration that a request may take to complete and is used for Client Registration and OP Discovery requests. |
OIDC HTTP Timeout Long |
Timeout in seconds for long duration HTTP calls. This defines the maximum duration that a request make take to complete and is used for most requests to remote endpoints. |
OIDC Pass Claims As |
Select how claims should be passed from the virtual server to the location. The default sends them as headers. |
Security |
|
Header Security |
Header security, by default several privacy and security related headers are set, in some cases (old applications for example) you might want to disable sending default headers to clients. HSTS can be disabled here if necessary. |
TLS Security profile |
TLS security profile as documented by Mozilla |
Disable Security Rules by ID |
Select one or multiple Web Protection rules to disable via their IDs. This can help to selectively disable rules that cause false positives, without disabling the Web Protection completely. |
Web Protection |
When Web Protection is enabled for the host you may disable it for specific destinations here, or set it to detection only for logging purposes. |
The section above defines the port the virtual server will listen on. Remember, in order to use ACME (Let’s encrypt) this should either be 443 or the traffic should be forwarded from port 443 to the port defined here.
Note
Port numbers can be reused. Multiple virtual servers can share the same port. Hostnames must be unique. They are used to identify the virtual server via SNI (Server Name Indication).
Warning
The ALPN protocol (the challenge type used by Let’s Encrypt) will resolve the FQDNs specified in the virtual host entry to the IP address of the firewall. If your DNS records point to both IPv4 and IPv6 addresses, IPv6 will be preferred by the challenge, so make sure your firewall is reachable via IPv6 as well if this is the case.
When supplying a certificate manually via the system trust store you can assign it in this dialog as well.
Configure locations
The virtual server itself doesn’t provide much content to the user other than offering a page telling access is prohibited, so the next step is to map directories to external locations. These can be defined in the Locations grid underneath the Virtual servers.
There are different types of locations:
- Proxy Pass, which Reverse Proxies the HTTP traffic
- Proxy Pass Match, which Reverse Proxies the HTTP traffic but has regex support
- Redirect, which creates a HTTP redirect
- Redirect Match, which creates a HTTP redirect but has regex support
- Exchange Server, a template for Microsoft Exchange servers
Proxy Pass
Option |
Description |
|---|---|
Enabled |
Enable this location |
VirtualServer |
The server this location belongs to |
Local path |
Local path of the HTTP request to match (e.g. |
Type |
ProxyPass |
Remote destinations |
Locations to forward requests to, when more than one is provided, requests will be
loadbalanced in a round robin fashion. Supports |
Access control |
List of networks allowed to access this path (empty means any) |
Overlay error pages |
Overlay common error pages with the ones specified in the virtual server. |
Description |
User friendly description for this location |
Proxy Options |
|
OIDC Auth Required |
Require OpenID Connect authentication for this location if a provider has been selected in the virtual server. |
OIDC Claims |
Select claims that must match for authorization. Multiple claims will be evaluated via OR operator. The default “valid-user” will allow access for any authenticated user in your OIDC scope. |
Proxy Options |
|
TLS header passthrough |
Select which headers to passthrough to the client, all headers will be prefixed with X- to distinct them more easily from the applications perspective. The original headers use underscores (_) these will be replaced for minus (-) signs to prevent applications dropping them. |
Request Headers |
Select how headers should be processed in the request from this location to the destination |
Preserve Host |
When enabled, this option will pass the Host: line from the incoming request to the proxied host, instead of the hostname specified in the location. This option should normally be turned Off. It is mostly useful in special configurations like proxied mass name-based virtual hosting, where the original Host header needs to be evaluated by the backend server. |
Connection timeout |
Connect timeout in seconds. The number of seconds the server waits for the creation of a connection to the backend to complete. |
timeout |
Socket timeout in seconds. The number of seconds the server waits for data sent by / to the backend. |
Response field size |
Adjust the size of the proxy response field buffer. The buffer size should be at least the size of the largest expected header size from a proxied response. |
The options here are quite simple, first you define a path on your end (/ in our example), next you define one or more
destinations this path should map to (for example you could point to a public server here, like https://opnsense.org).
Note
When more than one destination is provided, the load will be balanced automatically.
Tip
Constraining access to allow only specific networks or hosts can be arranged using the Access control input.
Proxy Pass Match
The Proxy Pass Match type is the advanced alternative to Proxy Pass.
Choosing it will turn the Local path field into Location Match, and the new Remote path field into Proxy Pass Match.
These types allow you to match requests based on a regular expression pattern instead of just a literal path.
The match is entered into Local path and the substitution groups can be set in Remote path.
Here is an example how this can look like:
Option |
Description |
|---|---|
Local path |
|
Remote path |
|
Tip
^: Match start of the URL path/manual/: Match the literal string /manual/(.*): Capture any characters (zero or more) after /manual/ — this is group 1$: Match end of the string$1: Reference the captured group from the local path. In this example it strips /manual/ from the URL path internally.
Attention
This is an advanced feature for edge cases like stripping paths from requests to form a new base path, or anchoring a path precisely. It can also be used to prevent trailing slashes being attached which break some URL parameter schemes. In most cases using the plain Proxy Pass will give you the desired result automatically.
Redirect
Option |
Description |
|---|---|
Enabled |
Enable this location |
VirtualServer |
The server this location belongs to |
Local path |
Local path of the HTTP request to match (e.g. |
Type |
Redirect |
HTTP redirection message |
Choose the HTTP redirection message. The default is 307, but others like 301 and 308 are also available. |
Remote destinations |
Locations to redirect requests to, only one is allowed per location per redirect |
Access control |
List of networks allowed to access this path (empty means any) |
Description |
User friendly description for this location |
When setting up a redirect, it will also match HTTP if Redirect HTTP to HTTPS in General Settings has been enabled. If not, only HTTPS is matched.
Note
When a / location with a Redirect has been created, there can’t be any additional ProxyPass locations that match
the same / location, nor a more specific /docs location. The redirect will match first, since it will catch and
redirect all traffic of the virtual server location. What is possible though, is that there is a /docs location that
redirects, and an additional /html location that proxies traffic, in the scope of the same virtual server.
Redirect Match
The Redirect Match type is the advanced alternative to Redirect.
Choosing it will turn the Local path field into Location Match, and the Remote destinations field into Redirect Match.
Wrapping Redirect into a Location behaves slightly differently than doing the same with Proxy Pass, as regular expression groups cannot be passed into the location.
The intended way is using environment variables. See mod_alias for more information.
Here is an example how this can look like:
Option |
Description |
|---|---|
Local path |
|
Remote destinations |
|
Tip
When using the normal Redirect, a common trap is redirects that are infinite due to the apache trailing slash issue.
This can be solved via Redirect Match by setting Local path as ^/?$ which force a match from the start of the
first found slash.
Attention
In most cases using the plain Redirect will give you the desired result automatically.
Exchange Server
Option |
Description |
|---|---|
Enabled |
Enable this location |
VirtualServer |
The server this location belongs to |
Type |
Exchange Server |
Remote destinations |
Locations to redirect requests to, only one is allowed per location per redirect |
Restrict Exchange Paths |
Restrict Exchange Server specific paths to networks provided in the Access control field. If paths are selected, exactly these paths will have the Access control attached. Access to path / is filtered per default with a redirect to /owa. All non-selected paths will be allowed from all networks. |
Access control |
Constrain access to networks provided in this list, when not provided no constraints apply. When type is Exchange Server, it will restrict access to paths selected in Restrict Exchange Paths. |
Description |
User friendly description for this location |
Prerequisites
To successfully reverse proxy an Exchange Server, a few conditions must be met:
The communication between Apache and the Exchange Server must happen via HTTPS.
The Exchange Server must have its internal and external URLs set correctly, preferably to the same hostnames that will be set as virtual servers.
Common hostname/path combinations are:
VirtualDirectory |
Internal and external URL of Exchange Server |
|---|---|
OwaVirtualDirectory |
|
EcpVirtualDirectory |
|
WebServicesVirtualDirectory |
|
ActiveSyncVirtualDirectory |
|
OabVirtualDirectory |
|
MapiVirtualDirectory |
|
OutlookAnywhere |
|
ClientAccessService |
|
When using a self-signed certificate, the authority for the certificate must be imported into .
The certificate must include mail.example.com and autodiscover.example.com in its SAN.
Without trust established between the OPNsense and the Exchange Server, the connection will fail since only encrypted
connections are allowed to an Exchange Server.
Attention
Exchange Servers use a feature called “Extended Protection” which requires the same certificate to be used by the web application firewall and the Exchange Server itself.
Attention
Outlook passthrough via either RCP/HTTP or MAPI/HTTP is getting more challenging due to the deprecation of the NTML protocol. If authentication popups happen, it can help to set the “Multi Processing Modules” to “mpm-prefork”. Mitigating all authentication issues might not be possible anymore, since the required NTLM replacement protocol OAuth is only available for Exchange Online.
Setup
Create two virtual servers with the hostnames of the Exchange Server, e.g., autodiscover.example.com and
mail.example.com. Select Enable ACME or use your own certificate, set Header Security to Off / compatibility mode,
set Web Protection to Detection Only. Adjust these later once the Exchange Server works correctly through the reverse proxy.
Create a Location with the Type Exchange Server for each of these virtual servers. As Remote destinations use the internal IP address
of the Exchange Server, e.g., https://192.168.10.10. If the virtual servers use the same hostnames as the Exchange Server,
trust is automatically established with host header passthrough.
These new Locations will create all virtual directories the Exchange Server requires automatically.
With the options Restrict Exchange Paths and Access control, access to specific paths can be restricted. This is recommended for the /ecp path.
The finished configuration should look like this:
Virtual Servers
Virtual Server
Option |
Description |
|---|---|
Enabled |
|
ServerName |
|
Trust |
|
Enable ACME |
|
SSL Proxy check peer |
|
Security |
|
Header Security |
Off / compatibility mode |
TLS Security profile |
Intermediate |
Web Protection |
Detection Only |
Location
Option |
Description |
|---|---|
Enabled |
|
VirtualServer |
|
Type |
Exchange Server |
Remote destinations |
|
Restrict Exchange Paths |
|
Access control |
|
Note
In case an internal hostname is used in Remote destinations, ensure this name is in the SAN and common name of the self-signed certificate of the Exchange Server. This hostname must be resolvable from the OPNsense. Do not use the same hostname for Virtual servers and Remote destinations to avoid creating a reverse proxy loop.
Test web protection
When web protection was enabled, we always advise to test if it’s actually functional. Luckily this is quite easy to test using a webbrowser. For this example we will try to inject some sql code in the url, which should be blocked when properly configured:
https://your.example.domain/?id=100 or 'x'='y'
This should show a page similar to the one below:
When deploying web protection for virtual servers, start with the Detection Only setting that can be set per virtual server. This way, you can evaluate the Web Security log file, and look for rules that match.
This will reveal if the web application might be outdated and needs patching, because several web protection rules match and would block connections.
If they are false positives, the rule IDs can be set as exemptions with the option Disable Security Rules by ID. Search the rules in the dropdown, and select multiple ones you want to exclude.
After this configuration, set the Web Protection to On (default) to enable it. The web application should now be configured for production. If there are still errors, repeat the above steps.
Attention
Do not exclude too many rules. These matches could be a potential misconfiguration of the web application behind the WAF. Only exclude rules that totally break the functionality of the web application.
Secure WebDav and HTTP File Servers
These servers have specific requirements to work through a WAF. They need an extended set of HTTP Verbs, and higher thresholds for the Request and Response Body.
A popular example for a WebDAV Server is Nextcloud or Owncloud.
Go to the Web Protection Settings, and set the Allowed HTTP Verbs to:
COPY, DELETE, GET, HEAD, LOCK, MKCOL, MOVE, OPTIONS, POST, PROPFIND, PROPPATCH, PUT, TRACE, UNLOCK.
To allow large file uploads, set Request Body Limit Action to Process Partial. If you want to process as much content of the file as possible, enable the advanced mode and set custom values for the Request Body and Response Body limits.
If the file is larger than the configured limits, it will only be processed partially. This means, the whole file will be uploaded, but only a portion of the file is analyzed by the web application parser. Rejecting can improve security, yet will make large files fail completely if they exceed the configured hard limits.
Note
Increasing the Body limits will increase the log file sizes, and will eventually use the disk of the OPNsense to write files upon inspection. For this, the Request Body in Memory Limit can be increased to 1GB to focus on RAM usage. If you want to use the least resources, logging and disk I/O, leave all settings on default, and set Request Body Limit Action to Process Partial.
Tip
If many different file extensions are hosted on the WebDAV server, some of these will be blocked by default rules. In that case,
disable the rule: 920440 (URL file extension is restricted by policy)
Request Headers
In some cases it is a requirement to manipulate request headers. The Request Header Directive can add, merge, change or remove HTTP request headers.
In our example, we unset the Accept-Encoding header to potentially prevent BREACH attacks.
Go to and create a new header:
Option |
Description |
|---|---|
Type |
|
Header |
|
Value |
(leave this empty) |
Afterwards, go to an existing location in and select it in (Proxy Options) Request Headers.
After applying the configuration, the header will be unset from all requests of this location to the Remote destinations.
Tip
More information about the available request header types can be found here: https://httpd.apache.org/docs/current/mod/mod_headers.html#requestheader
Protect a local server with certificates
In the above virtual host configuration are a couple of parameters related to client authentication. The advantage of using these is that you can prevent unauthorized access to services using certificates signed by a (local) certificate authority.
To use this functionality, first make sure you have a certificate authority defined in which you are going to use to create certificates for your clients.
Next step is to add a VirtualServer which contains at least the following information:
Option |
Description |
|---|---|
ServerName |
The fully qualified domain name this host listens to |
Port |
Port number to bind to, you can use Port forwarding to redirect traffic from standard ports to non standard ones when needed |
Certificate / Enable ACME |
Either use an ACME certificate or define one yourself, this one should be trusted by the browser connecting to this host |
CA for client auth |
select the Authority created earlier |
Followed by a location, which maybe as simple as binding path / to a local machine without certificate at http://10.0.0.1.
Tip
You can use revocation lists to pull back access rights for selected clients, just make sure to restart the service in order to make the changes effective.
After this step, clients should not be able to access the virtual host, next you can create a certificate for the client and import it in the trust store. Usually browsers automatically pick these up when allowed by the client.
Protect a location with OpenID Connect
In the above virtual host and location configuration are a couple of parameters related to OpenID Connect. The advantage of using these is that you can prevent unauthenticated and unauthorized access to services using an identity provider.
First, add an identity provider for service OPNWAF in .
For more information refer to the OpenID Connect manual.
Next, add it to a virtual server in :
Option |
Description |
|---|---|
OpenID Connect |
|
OIDC Provider |
Choose the identity provider created in |
OIDC Redirect URI |
Leave default, this will create a URI that must be set with your identity provider.
If the virtual server is example.com it will become |
As final step, ensure the following is set in each ProxyPass location of this virtual server:
Option |
Description |
|---|---|
OpenID Connect |
|
OIDC Auth Required |
Select to enforce OIDC authentication with the below claim. |
OIDC Claims |
Leave on default to allow any authenticated user in the OIDC scope access to the location. |
After applying, the location will need authentication (user must log in).
OpenID Connect claims
A claim is a piece of information that can be used to identify a user. This means you can create a stricter policy which user has access to the location, not only enforcing authentication but also authorization.
As example, we only want to grant access to a location for all users with the first name John.
First, we add a claim in :
Option |
Description |
|---|---|
OpenID Connect |
|
Claim type |
Most claim types are standardized via the OIDC spec.
Some provider specific options are also offered (group).
For our example case we choose |
Claim value |
|
Next, we add the claim to an OpenID Connect enabled location in :
Option |
Description |
|---|---|
OpenID Connect |
|
OIDC Auth Required |
Select to enforce OIDC authentication with the below claim. |
OIDC Claims |
|
After applying, the location will need authentication (user must log in) and authorization (user must be John).
Note
Multiple claims can be selected, they will be combined via or operator.
Tip
Authorizing unique users can be done with the preferred_username claim, which is the name a user authenticates with.
Some identity providers can send groups (non-standard) in their OIDC scope which simplifies authorization when you have a large amount of users.
Error Documents
By default, generic Apache documents will be served for HTTP response status codes. The most common client error responses can be styled OPNsense themed, or be branded with your own style.
To download the default error document templates, go to .
Select the Download command in the Default row. Afterwards you can unzip the archive, and change the individual error documents.
When you are done, select + to open the upload dialogue:
Option |
Description |
|---|---|
Name |
Name for this template, e.g. |
Uri |
Uri used to serve error pages, when unspecified, /__waf_errors__/ will be used. Best to use the offered default. |
Content |
Select the zip archive with the altered error documents. |
After saving, the error documents can be added in :
Option |
Description |
|---|---|
Error Document |
|
To optionally overlay any error with only the template provided ones, you can set the following in a location:
Option |
Description |
|---|---|
Overlay error pages |
Overlay common error pages with the ones specified in the virtual server. This means
that all HTTP response status codes received from the |
Tip
When using OpenID Connect, it is a good idea to either use the Default or custom error documents, to ensure the Unauthorized
error pages have a more cohesive and user friendly style.
Server Status
The server exposes metrics that can be revealed in .
You can find tabs with general information, workers, current requests and ACME certificates.
If the server behaves unexpected, checking the current requests and server load can reveal potential issues:
Detect backend connectivity issues
Requests that remain open for unusually long periods or repeatedly fail may indicate that an upstream service is slow or unreachable. Inspecting the active request list can help determine whether the issue originates from the reverse proxy or the backend application.
Validate configuration changes in real time
After modifying the configuration, the status page can be used to verify that requests are handled as expected. Observing request paths and worker activity allows administrators to confirm that traffic reaches the intended backend services.
Find malicious clients
Malicious clients could DoS the hosted websites if the CPU load is very high and the number of concurrent requests is unexpected.
Tip
Server statistics are API enabled, meaning you could export them to an external monitoring system. Since they are not stored on disk, persistence requires external polling.